Showing posts with label WSO2 ESB. Show all posts

Friday, July 15, 2016

WSO2 ESB Configure Datasource

     WSO2 ESB has two built in mediators called DBLookup and DBReport mediators that allows you to do database related operations.
In order to use these mediators you will require to load the database drivers, so copy those drivers into \<wso2esb-4.9.0>\repository\components\extensions directory.

Configuration for DBLookup is something similar to this,
<dblookup xmlns="http://ws.apache.org/ns/synapse">
 <connection>
  <pool>
   <driver>org.apache.derby.jdbc.ClientDriver</driver>
   <url>jdbc:derby://localhost:1527/esbdb;create=false</url>
   <user>esb</user>
   <password>esb</password>
  </pool>
 </connection>
 <statement>
  <sql>select column1 from my_table where name =?</sql>
  <parameter expression="get-property('anyParam1')" type="VARCHAR" />
  <result name="anyName" column="column1"/>
 </statement>
</dblookup>

Configuration for DBReport is very similar to the above,
<dbreport xmlns="http://ws.apache.org/ns/synapse">
 <connection>
  <pool>
   <driver>org.apache.derby.jdbc.ClientDriver</driver>
   <url>jdbc:derby://localhost:1527/esbdb;create=false</url>
   <user>esb</user>
   <password>esb</password>
  </pool>
 </connection>
 <statement>
  <sql>update my_table column1 = ? where name =?</sql>
  <parameter expression="get-property('anyParam1')" type="VARCHAR" />
  <parameter expression="get-property('anyParam2')" type="VARCHAR" />
 </statement>
</dblookup>

For better manageability, you would require to configure a datasource instead of configuring the connection pool using database properties in the proxy xml service.
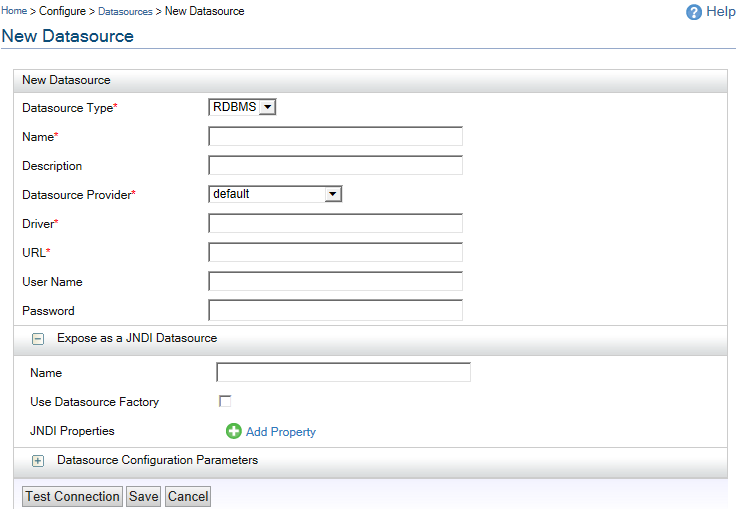
Configuring datasource in WSO2 ESB is really simple. Start the wso2 server and login to management console at https://localhost:9443/carbon
Go to Configure tab on the left and then navigate to Datasources
Click on Add datasource link,


Fill out the details as required. Enter the Name for JNDI datasource as jdbc/demoDB.
Test the connection, save if successful.
Now you can reconfigure your DB mediators in proxy service xml to use the datasource as shown below,

<dblookup xmlns="http://ws.apache.org/ns/synapse">
 <connection>
  <pool>
   <dsName>jdbc/demoDB</dsName>
  </pool>
 </connection>
 <statement>
  <sql>select column1 from my_table where name =?</sql>
  <parameter expression="get-property('anyParam1')" type="VARCHAR" />
  <result name="anyName" column="column1"/>
 </statement>
</dblookup>


That's easy enough..!

Thursday, July 14, 2016

WSO2 - Send a message to a Topic/Exchange

I ran into small issue trying to integrate Rabbit MQ with WSO2 ESB. Well configuring rabbit itself with WSO2 is very simple but the issue was publishing a message directly to a Topic or an exchange.
WSO2 provides a standard means of AMQP transports and using send mediator you could configure message sender in your proxy service like as shown below,
<?xml version="1.0" encoding="UTF­8"?>
<proxy xmlns="http://ws.apache.org/ns/synapse"name="AMQPProducerSample"transports="http"statistics="disable"trace="disable"startOnLoad="true">
<target>
 <inSequence>
    <property name="OUT_ONLY" value="true"/>
    <property name="FORCE_SC_ACCEPTED" value="true" scope="axis2"/>
     <send>
      <endpoint>
       <address uri="rabbitmq:/AMQPProducerSample?rabbitmq.server.host.name=localhost&amp;rabbitmq.server.port=5672&amp;rabbitmq.queue.name=queue&amp;rabbitmq.queue.route.key=route&amp;rabbitmq.exchange.name=exchange"/>
      </endpoint>
    </send>
 </inSequence>
 <outSequence>
        <send/>
 </outSequence>
</target>
<description/>
</proxy>
Notice the uri attribute's of address element, the issue is you can not send a message without queue information. That means you will not be able to drop a message directly into the exchange to which one or more queues are listening. This forces to change your architecture a bit to introduce a dummy queue or reuse one of your listening queue to drop a message. But without making these changes you could write a simple class mediator using rabbitmq client and drop a message directly into the exchange.
Here is the code that does it,
public class PublisherMediator extends AbstractMediator {
 private static final String EXCHANGE_NAME = "my_exchange";
 private static final String ROUTING_KEY = "my_route_key";

 @Override
 public boolean mediate(MessageContext mc) {
  String myMessage = (String) mc.getProperty("my_message");
  byte[] message = myMessage.getBytes();
  ConnectionFactory factory = new ConnectionFactory();
  factory.setHost("localhost");
  Connection connection = null;
  Channel channel = null;
  try {
   connection = factory.newConnection();
   channel = connection.createChannel();
   channel.exchangeDeclare(EXCHANGE_NAME, "fanout", true);
   channel.basicPublish(EXCHANGE_NAME, ROUTING_KEY, null, message);
   System.out
     .println(" Message Sent to Exchange " + EXCHANGE_NAME
       + " using routing key " + ROUTING_KEY + ":"
       + message + "'");
  } catch (IOException e) {
   e.printStackTrace();
  } catch (TimeoutException e) {
   e.printStackTrace();
  } finally {
   try {
    if(channel != null) 
     channel.close();
    if(connection != null)
     connection.close();
   } catch (IOException e) {
    e.printStackTrace();
   } catch (TimeoutException e) {
    e.printStackTrace();
   }
  }

  return true;
 }
}

Now add this class mediator into proxy service, the revised proxy looks like this,

<?xml version="1.0" encoding="UTF­8"?>
<proxy xmlns="http://ws.apache.org/ns/synapse"name="AMQPProducerSample"transports="http"statistics="disable"trace="disable"startOnLoad="true">
<target>
 <inSequence>
    <property name="OUT_ONLY" value="true"/>
    <property name="FORCE_SC_ACCEPTED" value="true" scope="axis2"/>
 <property description="Set Message" expression="message expression|evaluation"
    name="my_message" scope="default" />
     <class name="com.vinay.PublisherMediator" /> 
 </inSequence>
 <outSequence>
        <send/>
 </outSequence>
</target>
<description/>
</proxy>
 Make sure to add Rabbit MQ client jar to the classpath of mediator project. That's all it takes to drop a message directly into the Rabbit MQ exchange, no biggie but hope this helps someone.

Wednesday, July 13, 2016

Install New Relic Agent for WSO2 ESB on Windows Platform

Here is how you would configure new relic APM agent for WSO2 ESB running on windows.
I tested this on WSO2 4.9.0 version on windows 7 and 2012 server.
First few attempts to configure New Relic agent ran into issues like,
Error opening zip file or JAR manifest missing : /newrelic.jar
Error occurred during initialization of VM
agent library failed to init: instrument

and sometimes into this,
Error bootstrapping New Relic agent: java.lang.RuntimeException: java.io.IOException: The system cannot find the path specified
java.lang.RuntimeException: java.io.IOException: The system cannot find the path specified


But after couple of hours of playing around, I figured it was a permission issue on the new relic jar and location. You have to make sure that user that owns wso2 server execution also has access to execute new relic jar.
Alternate solution is to use the new relic directory as a java temp directory and then run the agent from that location.

The following should be added to set CMD_LINE_ARGS line in wso2server.bat file,
-Djava.io.tmpdir="/path/to/wso2/wso2esb-4.9.0/newrelic" -javaagent:" /path/to /wso2/wso2esb-4.9.0/newrelic/newrelic.jar"

Side Note on java.io.tmpdir
The default temporary-file directory is specified by the system property java.io.tmpdir. On UNIX systems the default value of this property is typically "/tmp" or "/var/tmp"; on Microsoft Windows systems it is typically "c:\temp". A different value may be given to this system property when the Java virtual machine is invoked, but programmatic changes to this property are not guaranteed to have any effect upon the the temporary directory used by this method.


Start wso2 server using wso2server.bat, you could see following
com.newrelic INFO: New Relic Agent: Loading configuration file "C:\tools\wso2\wso2esb-4.9.0\newrelic\.\newrelic.yml"
com.newrelic INFO: New Relic Agent: Writing to log file: C:\tools\wso2\wso2esb-4.9.0\newrelic\logs\newrelic_agent.log

Now you can see the application statistics by logging into new relic dashboard https://rpm.newrelic.com

Reference:
Configure WSO2 on Linux