Friday, July 15, 2016

WSO2 ESB Configure Datasource

     WSO2 ESB has two built in mediators called DBLookup and DBReport mediators that allows you to do database related operations.
In order to use these mediators you will require to load the database drivers, so copy those drivers into \<wso2esb-4.9.0>\repository\components\extensions directory.

Configuration for DBLookup is something similar to this,
<dblookup xmlns="http://ws.apache.org/ns/synapse">
 <connection>
  <pool>
   <driver>org.apache.derby.jdbc.ClientDriver</driver>
   <url>jdbc:derby://localhost:1527/esbdb;create=false</url>
   <user>esb</user>
   <password>esb</password>
  </pool>
 </connection>
 <statement>
  <sql>select column1 from my_table where name =?</sql>
  <parameter expression="get-property('anyParam1')" type="VARCHAR" />
  <result name="anyName" column="column1"/>
 </statement>
</dblookup>

Configuration for DBReport is very similar to the above,
<dbreport xmlns="http://ws.apache.org/ns/synapse">
 <connection>
  <pool>
   <driver>org.apache.derby.jdbc.ClientDriver</driver>
   <url>jdbc:derby://localhost:1527/esbdb;create=false</url>
   <user>esb</user>
   <password>esb</password>
  </pool>
 </connection>
 <statement>
  <sql>update my_table column1 = ? where name =?</sql>
  <parameter expression="get-property('anyParam1')" type="VARCHAR" />
  <parameter expression="get-property('anyParam2')" type="VARCHAR" />
 </statement>
</dblookup>

For better manageability, you would require to configure a datasource instead of configuring the connection pool using database properties in the proxy xml service.
Configuring datasource in WSO2 ESB is really simple. Start the wso2 server and login to management console at https://localhost:9443/carbon
Go to Configure tab on the left and then navigate to Datasources
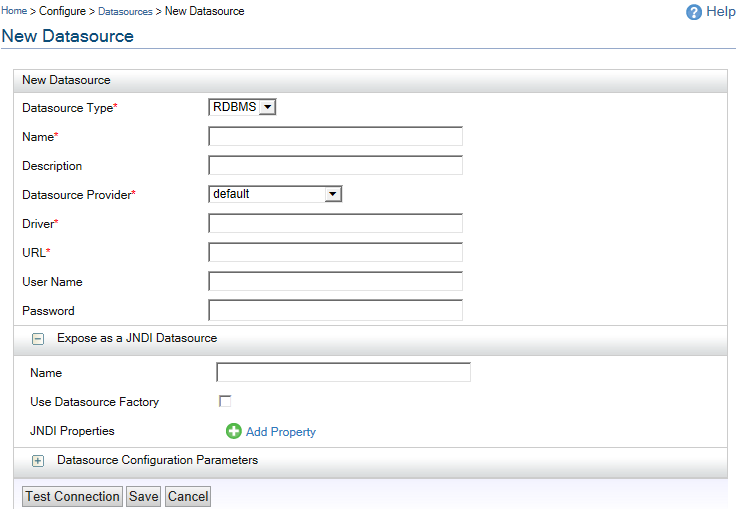
Click on Add datasource link,


Fill out the details as required. Enter the Name for JNDI datasource as jdbc/demoDB.
Test the connection, save if successful.
Now you can reconfigure your DB mediators in proxy service xml to use the datasource as shown below,

<dblookup xmlns="http://ws.apache.org/ns/synapse">
 <connection>
  <pool>
   <dsName>jdbc/demoDB</dsName>
  </pool>
 </connection>
 <statement>
  <sql>select column1 from my_table where name =?</sql>
  <parameter expression="get-property('anyParam1')" type="VARCHAR" />
  <result name="anyName" column="column1"/>
 </statement>
</dblookup>


That's easy enough..!

WSO2 ESB Simple vs Complex Data Operations

WSO2 supports simple JDBC operations by providing couple of mediators, called DBLookup and DBReport Mediators.
According to the WSO2 docs,
The DBLookup Mediator can execute an arbitrary SQL select statement and then set a resulting values as a local message property in the message context. The DB connection used may be looked up from an external data source or specified inline.
DBReport is similar to DBLookup but should be used to insert and update data.

The limitation of DBLookup is that it will return only one row and can not return multiple rows. WSO2 recommends using WSO2 Data Services product for any use cases that falls outside of this scope.
DBReport mediator allows us to define one or more DML statements within it like as shown below,
<dbreport xmlns="http://ws.apache.org/ns/synapse">
 <connection>
  <pool>
   <driver>org.apache.derby.jdbc.ClientDriver</driver>
   <url>jdbc:derby://localhost:1527/esbdb;create=false</url>
   <user>esb</user>
   <password>esb</password>
  </pool>
 </connection>
 <statement>
  <sql>update some_table1 set column1=? where column2 =?</sql>
  <parameter expression="" type=""/>
  <parameter expression="" type=""/>
 </statement>
 <statement>
  <sql>update some_table2 set column1=?, column2=? where column3 =?</sql>
  <parameter expression="" type=""/>
  <parameter expression="" type=""/>
  <parameter expression="" type=""/>
 </statement>
</dbreport>

These 2 mediator would suffice most of the simple and common use cases.

But there are use cases which pushes you to the other side when you are dealing with complex applications integration. Lets say a use case where you want to check if something exists, if so do some inserts updates on multiple tables and then return something else with in a single transaction.
WSO2 built in mediators would not help much with uses cases like this.

WSO2's OSGI framework offer serious limitations on using frameworks like Spring within WSO2. At this point you are kind of forced to write plain JDBC code on your own using class mediator.
Who wants to write this plain old boring JDBC boiler plate code line getConnection(), connection.createStatement(), connection.close() etc. Please refer to other article on how to configure the datasource.

You would obviously think of bringing in some open source tool that does all this so I decided to bring in apache commons DBUtils lib. Apparently there are some issues loading DButils in WSO2 ESB version 4.9.0 running on JDK8. It simply crashes the server, I mean the WSO2 server doesn't start up.

So I left with no choice other than building my own framework to achieve data operations using simple JDBC.
Here is the class that helps you get connection from datasource,
class DataSupport {

 public static DataSource sqlDataSource;
 private static String ENV_DS_KEY = "java.naming.factory.initial";
 private static String ENV_DS_VALUE = "org.wso2.carbon.tomcat.jndi.CarbonJavaURLContextFactory";
 private static String DEMO_DS = "jdbc/demoDB";

 /**
  * Defaults to DEMO_DS
  * 
  * @return
  */
 public static DataSource getDataSource() {
  return getDataSource(DEMO_DS);
 }

 /**
  * overloaded method for getDataSource()
  * 
  * @param dataSourceName
  * @return
  */
 public static DataSource getDataSource(String dataSourceName) {

  if (sqlDataSource != null)
   return sqlDataSource;
  if(dataSourceName == null)
   dataSourceName=DEMO_DS;
  try {
   Hashtable<String, String> environment = new Hashtable<String, String>();
   environment.put(ENV_DS_KEY, ENV_DS_VALUE);
   Context initContext = new InitialContext(environment);
   sqlDataSource = (DataSource) initContext.lookup(dataSourceName);
   if (sqlDataSource != null)
    System.out.println("Datasource Bind successfully :"
      + dataSourceName);
   else
    System.out.println("Cannot find DataSource Binding for: "
      + dataSourceName);

  } catch (NamingException e) {
   e.printStackTrace();
  }

  return sqlDataSource;
 }
 
 /**
  * Gets the connection If the DataSource is null then uses default
  * DataSource
  * 
  * @param dataSourceName
  * @return
  */
 public static Connection getConnection(DataSource dataSource)
   throws SQLException {

  Connection connection = null;
  if (dataSource == null)
   getDataSource();

  try {
   connection = sqlDataSource.getConnection();
  } catch (SQLException e) {
   System.out.println("Failed to obtain Connection for DataSource: ");
   System.out.println(e.getMessage());
  }

  return connection;
 }
}

You can add commit(), rollback() and close() methods to the above class.
After this you can write any class that simply obtains datasource, connection and does remaining boiler plate code as shown below,
public class DemoDBMediator extends AbstractMediator {

 private static String UPDATE1_SOME_TABLE = "Your update Query 1";
 private static String UPDATE2_SOME_TABLE = "Your update query 2";
 
 public boolean mediate(MessageContext mc) {

 try {
  DataSource dataSource = DataSupport.getDataSource();
  connection = DataSupport
    .getConnection(dataSource);
  preparedStatement = connection.prepareStatement(UPDATE1_SOME_TABLE);
  preparedStatement.setString(1, variable1);
  preparedStatement.setString(2, variable2);
  preparedStatement.executeUpdate();
  DataSupport.close(preparedStatement);
  
  preparedStatement = connection.prepareStatement(UPDATE1_SOME_TABLE);
  preparedStatement.executeUpdate();
  DataSupport.close(preparedStatement);

  DataSupport.commitAndcloseConnection(connection);
 } catch (SQLException e) {
  try {
   DataSupport.rollbackAndcloseConnection(connection);
  } catch (SQLException ex) {
   System.out
     .println("Error while closing connection"
       + ex.getMessage());
  }
                return false;

 } finally {
  try {
   DataSupport.close(preparedStatement);
   DataSupport.close(connection);
  } catch (SQLException e) {
   System.out
     .println("Error while closing connection"
       + e.getMessage());
  }

 }
      return true;
}

You can configure this class mediator in your proxy xml just like any other mediator.
Of course you are responsible for managing the transactions at connection level in this form of database operations.

Another approach if you are interested is, you could create your own DB Mediator by extending AbstractDBMediator, just like DBLookup or DBReport and build the WSO2 synapse OSGI bundle. You can get the wso2-synapse source code from GitHub.

Happy Coding!

Thursday, July 14, 2016

WSO2 - Send a message to a Topic/Exchange

I ran into small issue trying to integrate Rabbit MQ with WSO2 ESB. Well configuring rabbit itself with WSO2 is very simple but the issue was publishing a message directly to a Topic or an exchange.
WSO2 provides a standard means of AMQP transports and using send mediator you could configure message sender in your proxy service like as shown below,
<?xml version="1.0" encoding="UTF­8"?>
<proxy xmlns="http://ws.apache.org/ns/synapse"name="AMQPProducerSample"transports="http"statistics="disable"trace="disable"startOnLoad="true">
<target>
 <inSequence>
    <property name="OUT_ONLY" value="true"/>
    <property name="FORCE_SC_ACCEPTED" value="true" scope="axis2"/>
     <send>
      <endpoint>
       <address uri="rabbitmq:/AMQPProducerSample?rabbitmq.server.host.name=localhost&amp;rabbitmq.server.port=5672&amp;rabbitmq.queue.name=queue&amp;rabbitmq.queue.route.key=route&amp;rabbitmq.exchange.name=exchange"/>
      </endpoint>
    </send>
 </inSequence>
 <outSequence>
        <send/>
 </outSequence>
</target>
<description/>
</proxy>
Notice the uri attribute's of address element, the issue is you can not send a message without queue information. That means you will not be able to drop a message directly into the exchange to which one or more queues are listening. This forces to change your architecture a bit to introduce a dummy queue or reuse one of your listening queue to drop a message. But without making these changes you could write a simple class mediator using rabbitmq client and drop a message directly into the exchange.
Here is the code that does it,
public class PublisherMediator extends AbstractMediator {
 private static final String EXCHANGE_NAME = "my_exchange";
 private static final String ROUTING_KEY = "my_route_key";

 @Override
 public boolean mediate(MessageContext mc) {
  String myMessage = (String) mc.getProperty("my_message");
  byte[] message = myMessage.getBytes();
  ConnectionFactory factory = new ConnectionFactory();
  factory.setHost("localhost");
  Connection connection = null;
  Channel channel = null;
  try {
   connection = factory.newConnection();
   channel = connection.createChannel();
   channel.exchangeDeclare(EXCHANGE_NAME, "fanout", true);
   channel.basicPublish(EXCHANGE_NAME, ROUTING_KEY, null, message);
   System.out
     .println(" Message Sent to Exchange " + EXCHANGE_NAME
       + " using routing key " + ROUTING_KEY + ":"
       + message + "'");
  } catch (IOException e) {
   e.printStackTrace();
  } catch (TimeoutException e) {
   e.printStackTrace();
  } finally {
   try {
    if(channel != null) 
     channel.close();
    if(connection != null)
     connection.close();
   } catch (IOException e) {
    e.printStackTrace();
   } catch (TimeoutException e) {
    e.printStackTrace();
   }
  }

  return true;
 }
}

Now add this class mediator into proxy service, the revised proxy looks like this,

<?xml version="1.0" encoding="UTF­8"?>
<proxy xmlns="http://ws.apache.org/ns/synapse"name="AMQPProducerSample"transports="http"statistics="disable"trace="disable"startOnLoad="true">
<target>
 <inSequence>
    <property name="OUT_ONLY" value="true"/>
    <property name="FORCE_SC_ACCEPTED" value="true" scope="axis2"/>
 <property description="Set Message" expression="message expression|evaluation"
    name="my_message" scope="default" />
     <class name="com.vinay.PublisherMediator" /> 
 </inSequence>
 <outSequence>
        <send/>
 </outSequence>
</target>
<description/>
</proxy>
 Make sure to add Rabbit MQ client jar to the classpath of mediator project. That's all it takes to drop a message directly into the Rabbit MQ exchange, no biggie but hope this helps someone.

Wednesday, July 13, 2016

Install New Relic Agent for WSO2 ESB on Windows Platform

Here is how you would configure new relic APM agent for WSO2 ESB running on windows.
I tested this on WSO2 4.9.0 version on windows 7 and 2012 server.
First few attempts to configure New Relic agent ran into issues like,
Error opening zip file or JAR manifest missing : /newrelic.jar
Error occurred during initialization of VM
agent library failed to init: instrument

and sometimes into this,
Error bootstrapping New Relic agent: java.lang.RuntimeException: java.io.IOException: The system cannot find the path specified
java.lang.RuntimeException: java.io.IOException: The system cannot find the path specified


But after couple of hours of playing around, I figured it was a permission issue on the new relic jar and location. You have to make sure that user that owns wso2 server execution also has access to execute new relic jar.
Alternate solution is to use the new relic directory as a java temp directory and then run the agent from that location.

The following should be added to set CMD_LINE_ARGS line in wso2server.bat file,
-Djava.io.tmpdir="/path/to/wso2/wso2esb-4.9.0/newrelic" -javaagent:" /path/to /wso2/wso2esb-4.9.0/newrelic/newrelic.jar"

Side Note on java.io.tmpdir
The default temporary-file directory is specified by the system property java.io.tmpdir. On UNIX systems the default value of this property is typically "/tmp" or "/var/tmp"; on Microsoft Windows systems it is typically "c:\temp". A different value may be given to this system property when the Java virtual machine is invoked, but programmatic changes to this property are not guaranteed to have any effect upon the the temporary directory used by this method.


Start wso2 server using wso2server.bat, you could see following
com.newrelic INFO: New Relic Agent: Loading configuration file "C:\tools\wso2\wso2esb-4.9.0\newrelic\.\newrelic.yml"
com.newrelic INFO: New Relic Agent: Writing to log file: C:\tools\wso2\wso2esb-4.9.0\newrelic\logs\newrelic_agent.log

Now you can see the application statistics by logging into new relic dashboard https://rpm.newrelic.com

Reference:
Configure WSO2 on Linux

Tuesday, June 7, 2016

Chicago Coder Conference 2016


       I had a good time at Chicago Coder Conference. Great new venue and lot of participation this year. That's a good news and thanks to the organizers.

      A good code is an art and it takes continuous learning to write good code. I could feel that urge in the audience to learn something new.

      I had an opportunity to present at the conference and my topic was "Business Driven Architecture".

      Business Driven Architecture, is a collective thought process to apply application architecture and design into code to deliver business value in development agility.
My presentation was about defining an application architecture and how to enforce design in the code. Design is an art and so how effectively we design our code to componentize the code base to focus on business values rather than creating dummy layers. Importance of Modularity and how it helps drive the development as well as deliver more effectively.

My presentation slide deck available on Slideshare and demo code on Github.

Enjoy learning and happy coding,
Vinay


Friday, March 25, 2016

Connecting to ElasticSearch

      Elasticsearch is a real-time distributed search and analytics engine. Elasticsearch, like most NoSQL databases, is document based storage in json format. An index is a flat collection of independent documents. An index really is a logical namespace pointing to one or more physical shards. Shards as containers for data, documents are stored and indexed in shards.

Elasticsearch supports two types of Java clients: Node Client and Transport Client. Transport client is typically used in java application and is considered to be efficient as it bypasses the process of marshalling & unmarhsalling of request to & from JSON which is typically done in most of the Rest based client.

Using TransportClient in your java application and connecting to elastic is incredibly simple, look at the following code to believe it.

import org.elasticsearch.client.transport.TransportClient;
import org.elasticsearch.common.settings.ImmutableSettings;
import org.elasticsearch.common.settings.Settings;
import org.elasticsearch.common.transport.InetSocketTransportAddress;
import org.elasticsearch.common.transport.TransportAddress;

public class ElasticRepository {
 private static final String ELASTIC_URL = "localhost";
 private static final String ELASTIC_PORT = "9300";
 private static final String ELASTIC_CLUSTER = "localhost";
 private static final String ELASTIC_USERNAME = "username";
 private static final String ELASTIC_PASSWORD = "password";
 private final static String ELASTIC_INDEX = "indexName";
 private final static String ELASTIC_TYPE_NAME = "typeName";

 public static void main(String[] args) {

  Settings settings = ImmutableSettings.settingsBuilder()
    .put("cluster.name", ELASTIC_CLUSTER)
    .put("shield.user", ELASTIC_USERNAME + ":" + ELASTIC_PASSWORD)
    .build();

  TransportClient transportClient = new TransportClient(settings);
  // Your random record/index id
  String indexId = "123";
  String sourceData = "This is the data source to be persisted in elastic";
  try {
   TransportAddress transportAddress = new InetSocketTransportAddress(
     ELASTIC_URL, Integer.parseInt(ELASTIC_PORT));
   transportClient.addTransportAddress(transportAddress);

   transportClient
     .prepareIndex(ELASTIC_INDEX, ELASTIC_TYPE_NAME, indexId)
     .setSource(sourceData).execute().actionGet();
  } catch (Exception e) {
   e.printStackTrace();
  } finally {
   transportClient.close();
  }
 }
}

Elastic Shield is an enterprise security tool to protect data in the elastic server. It provides role based protection to your data at the index level. You need to have an authorization in order to read or write to/from a specific index that is being protected through shield. Once elastic is protected by the shield the above code may not work and fail to connect. It would now require an authentication token in its request header.
Take a look at the code below,


 1
 2
 3
 4
 5
 6
 7
 8
 9
10
11
12
13
14
15
16
17
18
19
20
21
22
23
24
25
26
27
28
29
30
31
32
33
34
35
36
37
38
39
40
41
42
43
44
45
46
47
48
49
import static org.elasticsearch.shield.authc.support.UsernamePasswordToken.basicAuthHeaderValue;

import org.elasticsearch.client.transport.TransportClient;
import org.elasticsearch.common.settings.ImmutableSettings;
import org.elasticsearch.common.settings.Settings;
import org.elasticsearch.common.transport.InetSocketTransportAddress;
import org.elasticsearch.common.transport.TransportAddress;
import org.elasticsearch.shield.authc.support.SecuredString;

import org.elasticsearch.shield.authc.support.SecuredString;

public class ElasticRepository {
 private static final String ELASTIC_URL = "localhost";
 private static final String ELASTIC_PORT = "9300";
 private static final String ELASTIC_CLUSTER = "localhost";
 private static final String ELASTIC_USERNAME = "username";
 private static final String ELASTIC_PASSWORD = "password";
 private final static String ELASTIC_INDEX = "indexName";
 private final static String ELASTIC_TYPE_NAME = "typeName";

 public static void main(String[] args) {

  Settings settings = ImmutableSettings.settingsBuilder()
    .put("cluster.name", ELASTIC_CLUSTER)
    .put("shield.user", ELASTIC_USERNAME + ":" + ELASTIC_PASSWORD)
    .build();

  TransportClient transportClient = new TransportClient(settings);
  // Your random record/index id
  String indexId = "123";
  String sourceData = "This is the data source to be persisted in elastic";
  String token;
  try {
   token = basicAuthHeaderValue(ELASTIC_USERNAME,
     new SecuredString(ELASTIC_PASSWORD.toCharArray()));
   TransportAddress transportAddress = new InetSocketTransportAddress(
     ELASTIC_URL, Integer.parseInt(ELASTIC_PORT));
   transportClient.addTransportAddress(transportAddress);
   transportClient
     .prepareIndex(ELASTIC_INDEX, ELASTIC_TYPE_NAME, indexId)
     .putHeader("Authorization", token)
     .setSource(sourceData).execute().actionGet();
  } catch (Exception e) {
   e.printStackTrace();
  } finally {
   transportClient.close();
  }
 }
}

You would require elasticsearch-shield-1.0.2.jar, commons-codec-1.10.jar in your classpath. Line #34 shows how to generate a token using Shield's UsernamePasswordToken class. Once you have the token generated, you will need to set it into TransportClient's header as shown in line #41. This way you could connect to elastic by authenticating shield. 

That's it, happy coding...!

Reference: